

Treasured Hearts: Create a Charm Holder Pendant By Bobbi Maw
Do you have a collection of jewelry charms you’d like to wear, but don’t want to just slide them all on a chain? This cute little wirework tutorial shows you how to make a simple but elegant pendant to hold those cherished charms.
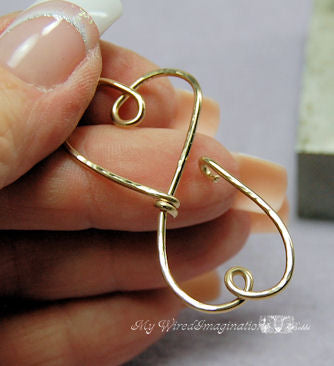
Treasured Hearts Charm Holder Pendant
The bottom heart opens so you can add to or rearrange your treasured collection. Download the digital pattern here
MATERIALS SUGGESTED:
7 to 12 inches of 16-gauge half-hard round wire depending on the size of the pendant you want to make. Dead soft wire is not recommended.
Two or three 6 mm (or larger) closed jump rings.
TOOLS NEEDED:
Round-nose pliers and/or bail pliers Chain nose pliers Wire rounder or file. Optional: Bench block and chasing hammer. Don’t forget the little extra necessities like a good ruler, cleaning/polishing cloth (I like Sunshine cloths), a permanent marker and magnifying glasses.

STEP 1. Cut and clean a 7-inch (17.8cm) piece of half-hard round wire. This makes a pendant roughly 1 3/4-inches (4.4cm) long. Cut a longer piece for a larger pendant. If the wire has lumps or slight bends in it, you can straighten them out, but for the most part, the natural curve in the wire aids in creating the first heart. Note: I love dead soft wire, but it doesn’t work for this project because it has no “spring back” to it, even with hammering.

STEP 2. With your round-nose pliers in your dominant hand, grasp the wire 2 inches from one end of the wire. I have the wire toward the base of the pliers jaws to create a medium size loop, and for stability. You can always go back and make the loop smaller if you need/want to, but it is incredibly difficult to start with a small loop and try and make it bigger later. Tip: Angle the tips of the pliers towards you while you work, so that you have a better view of your work. As much as possible, move the wire, not the pliers. You’ll find you have a nicer loop with less tool marks.

STEP 3. Hold the pliers steady, and use the thumb of your non-dominant hand to slowly bend the longer portion of wire in a curve away from you. Tip: Grip the wire (with your pliers) just tight enough to keep the wire from slipping, but not hard enough to put an ugly divot in it.

STEP 4. Continue bending the wire until the wires start to cross. spread the wires apart to form a loop around the pliers.

STEP 5. Use your fingers now to force the two ends of the wire out away from each other, which will create the top heart loop around the pliers. Notice my dominant hand and pliers really hasn’t moved all that much.

STEP 6. Spread the wires just far enough apart to create the loop, then stop.

If you take the wire off the pliers, this is what it should look like.

STEP 7. Put the pliers’ jaw back into the loop – this will help you hold onto the wire, and keep the loop from distorting. Use the thumb of your non-dominant hand to start shaping the left lobe of the heart.

Once the lobe of the heart is to this stage, you can set your pliers down to get a better grip.

STEP 8. Continue using the pad of your thumb to shape the heart. As you work, pull the end of the wire down in a curve. Work slowly, so you don’t get a sharp bend in the side of the wire.

STEP 9. Hold on to the completed side of the heart, and use the thumb on your dominant hand to shape the other lobe of the heart.

STEP 10. With both lobes formed, your heart should look something like this. The short wire should cross over the longer wire by about 10mm.

STEP 11. Slide two or three jump rings onto the shorter wire. These will act as the bail for your pendant. My jump rings appear to be so thick because they are not actually jump rings. I ran out while playing with this design, so these are “endless wire” earring hoops that I carefully pinched shut. 😊

STEP 12. Hold the heart firmly in your non-dominant hand, with the short wire overlapping the long wire by about a 1/2 inch or 10mm. Use chain-nose pliers to wrap the short wire around the long wire.

STEP 13. After you have made one full wrap with the short wire, use your flush cutters, and snip the very tip of the short wire off. You’re going to use a wire rounder or file on the end, and it’s less work if you start with a clean flat cut.

STEP 14. Use a wire rounder (or file) on the end of the wire to smooth out the scratchy parts. Technically, the wire rounder is only supposed to be able to handle up to 18-gauge wire, but I have used it on 16-gauge wire successfully.

A nice, smooth end won’t scratch the wearer or snag clothing.

STEP 15. The 16-gauge half-hard wire can be pretty tough for some to bend, especially the last little bit of the wrap. Use your chain-nose pliers as shown: One jaw on the bottom of the wrap, and the top pliers’ jaw on the end of the wire at the top. Use opposing pressure to get that last little bit of wire to lay flat. Tip: Use a very slight “rolling” motion to the right as you apply pressure to help insure you’re not just mashing it.

STEP 16. Firmly grasp the first heart in your non-dominant hand again, and use the pad of your thumb on your dominant hand to gently force a curve in the wire, in the opposite direction. Tip: Work on getting the wire to curve slowly. If you try to rush it, you will just get an ugly bend, not a soft curve. once you have curve in the second heart started, use round nose pliers to form the loop in the bottom heart.

STEP 17: Now that you have a decent curve started for the bottom heart, use round-nose pliers to grasp the curved wire approximately 1 inch from the wraps at the base of the first heart.

STEP 18. Pull the free end of the wire in an arc around the jaw of the pliers until it forms a full loop. reposition the pliers jaw to continue forming the loop.

Step 19. Reposition the loop onto the other jaw of the pliers as shown, and continue pulling the free end of the wire around in an arc to form the second lobe of the heart.

STEP 20. Pull the free end of the wire around until it forms the second lobe of the bottom heart, and crosses the first (top) heart, as shown.

STEP 21. Before you can form the hook, you need to finish the end of the wire as you did previously in Step 14.

STEP 22: Use one of the smaller steps on the bail pliers to form a hook in the end of the wire. With the front of the pendant facing you, grasp the wire at the very tip of the wire, and bend it towards the hearts.

STEP 23: Reposition the heart to make it more comfortable for you to work and see what you’re doing. For me it worked best to turn the hearts around and upside down.

STEP 24: Your loop may need minor adjustments so it clasps snugly, but not so tight that it's a pain to unhook. Tip: Pull the bottom heart open just a bit so that there is a gap of about 10mm. This gap will help provide the tension to stay closed. The loop in the bottom heart acts like the loop in a safety pin and helps it spring open when you unhook it.

STEP 25: You can add texture and extra hardness to the pendant with the ball end of a chasing hammer, and bench block. Hammer the pendant with the bottom heart open, not closed! Tip: Use the corner of the block so the wire can lay flat on the block. It takes very little “hammering” to add texture. Do not get carried away, or the heart will lose its spring. texture the wire with the ball end of the hammer - gently!

STEP 26. I hold the hammer close to the head to keep control of it. Baby taps are all that’s needed to add a kind of diamond cut texture to the wire.

STEP 27: As you work, avoid hammering the wire where it crosses, especially on the bottom heart – you would lose some of the spring that helps the latch hook and unhook. Tip: If the bail on your charm won’t fit over the whole loop on the bottom heart, gently lift up on the bottom wire so the loop wires aren’t touching each other. Your charms will easily thread onto both lobes of the heart. Now you can simply unhook the wire on the bottom heart, slide on your charms or small pendants, and latch the hook back. You can unhook it and rearrange your charms quite often!
Leave a comment if you like, and don't hesitate to holler if you have any questions at all.
wrap happy,
Bobbi
If you would like a downloadable copy of the tutorial, you can find it here: Treasured Hearts Charm Holder